
To help lessen drag, all RigONE sails are designed around the Reduced Diameter Mast, RDM. We recommend the WindwingRigONE 100% carbon RDM masts, especially if maximum speed is desired. Besides weight, the 100% carbon mast has a higher reflex value than a mast with lower carbon content. This becomes noticeable on a large sail, as the mast is more responsive and reflects back faster when you pump.  Any RDM mast will work with the RigONE sail and will perform at the level of the carbon content and the skill level of the sailor.


It should be noted: There are two cambers in the RigONE, as the sail is designed for maximum range of use. Sailors not accustomed to cambered sails can remove them.
RIGGING PROCEEDURES:
1: All Windwing sails are rolled on the starboard side.
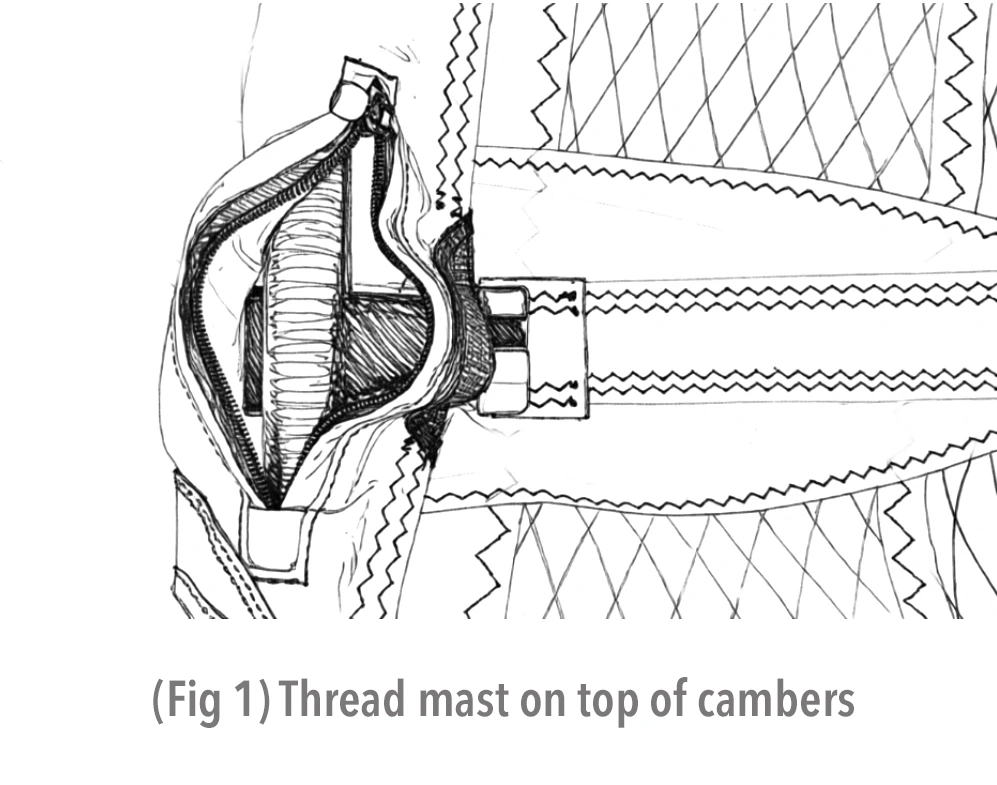
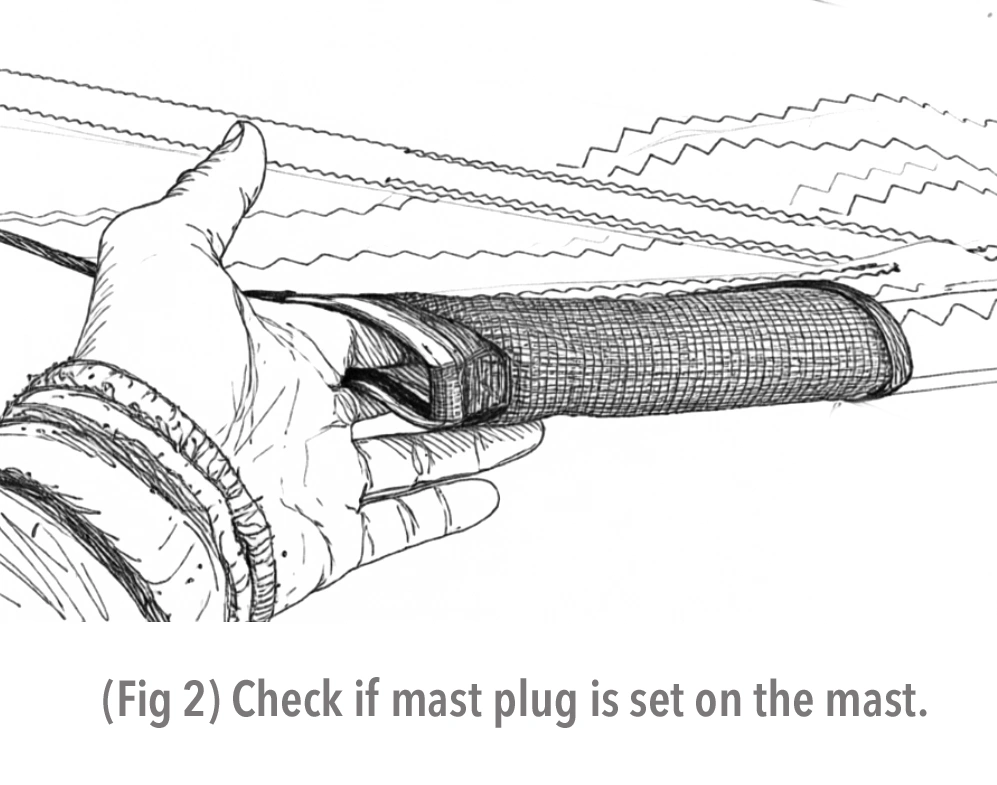
2: Once the sail is rolled out, thread the mast into the mast sleeve, making sure the mast rests on top of the two “Stubby” cambers (Fig 1). Once the mast reaches the top, make sure the male mast plug is firmly seated into the mast tip. (Fig 2) When rigging the sail for the first time, ensure the mast plug and mast tip are firmly connected. (After the first session, the tip plug will be set in place and will be aligned.)
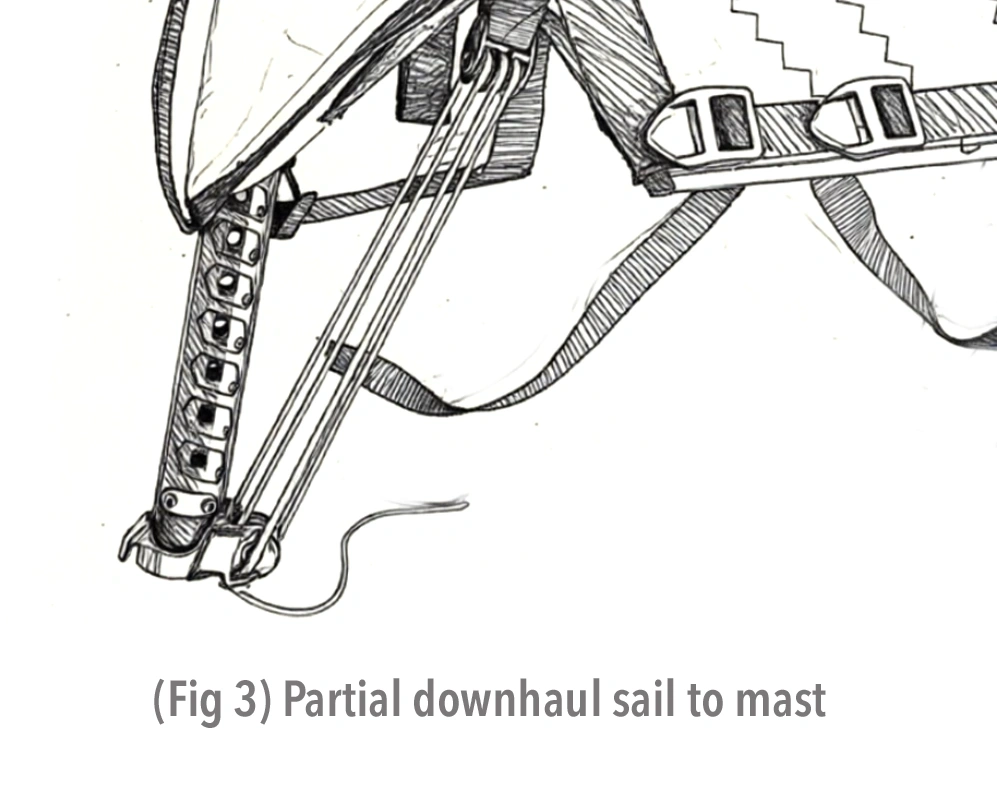
3: Secure the tack pulley to the extension base with light to medium tension (Fig 3). Do not fully tension the downhaul. Tension enough to tighten the sail to the mast. Too much tension now will make it impossible to pop the cambers in.

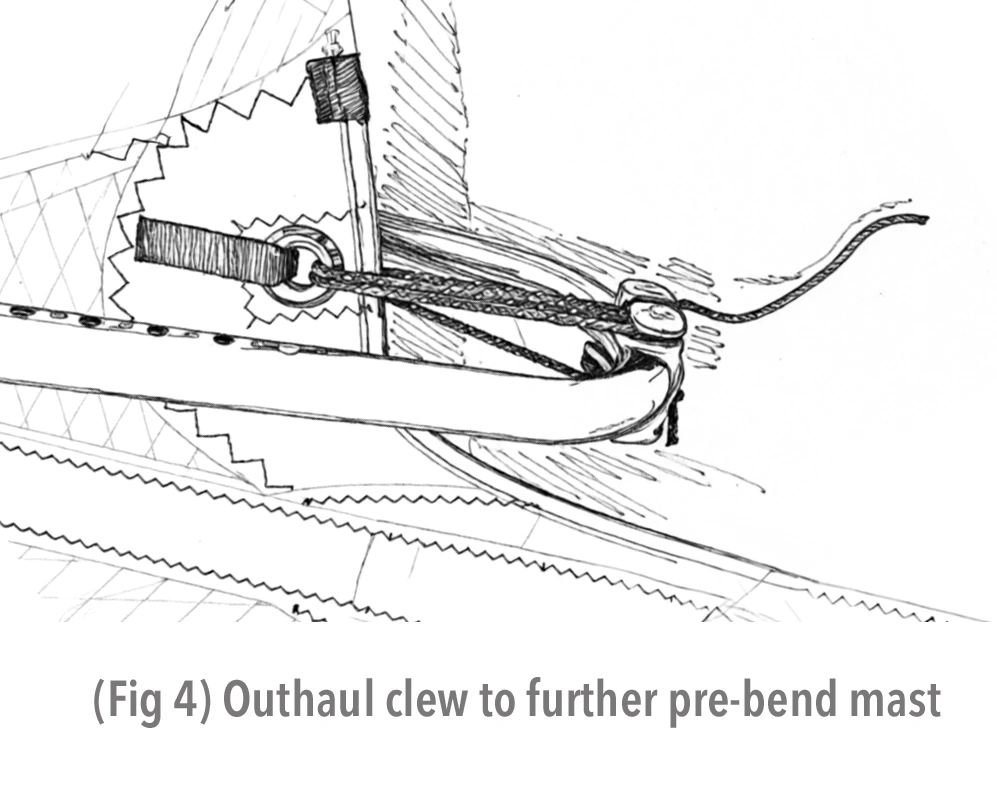
4: Attach the boom at the base of the boom opening (Fig 4). Once attached, extend the boom out from the clew at least 10” (25cm) and pull in the clew to the boom (Fig 5). This will pre-bend the mast for the final dawnhaul.
5: Go to the mast sleeve and press the sail camber down while pushing in the stubby cambers into the mast. They are called Stubby’s because they are not your typical cambers with wishbone sides. These cambers have no sides and rely on the mast sleeve to keep them in place. (They do pop off when there’s not enough tension in the mast sleeve.) When that happens, a camber spacer that comes with your sail needs to be installed (Fig 6).
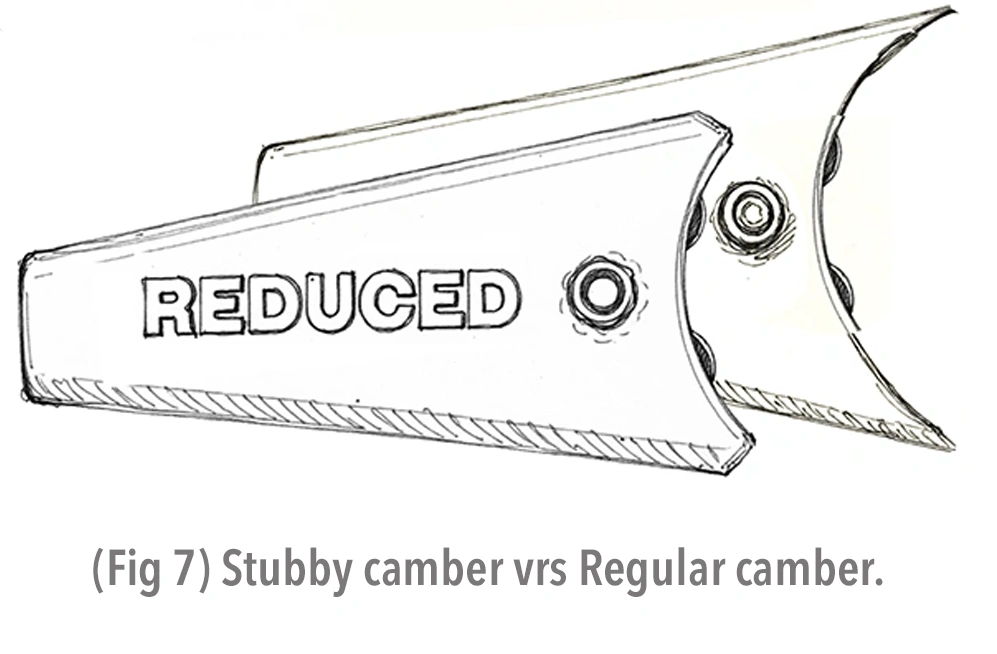
6: Stubby’s are easy to pop on the mast, but there must be a slight to medium downhaul tension for the stubby’s to hold in place. (Fig 7).
7: Once the cambers are popped in, it’s time to fully downhaul the sail. The amount of downhaul will depend on the wind strength. The following two visual guides will help determine the amount of downhaul.
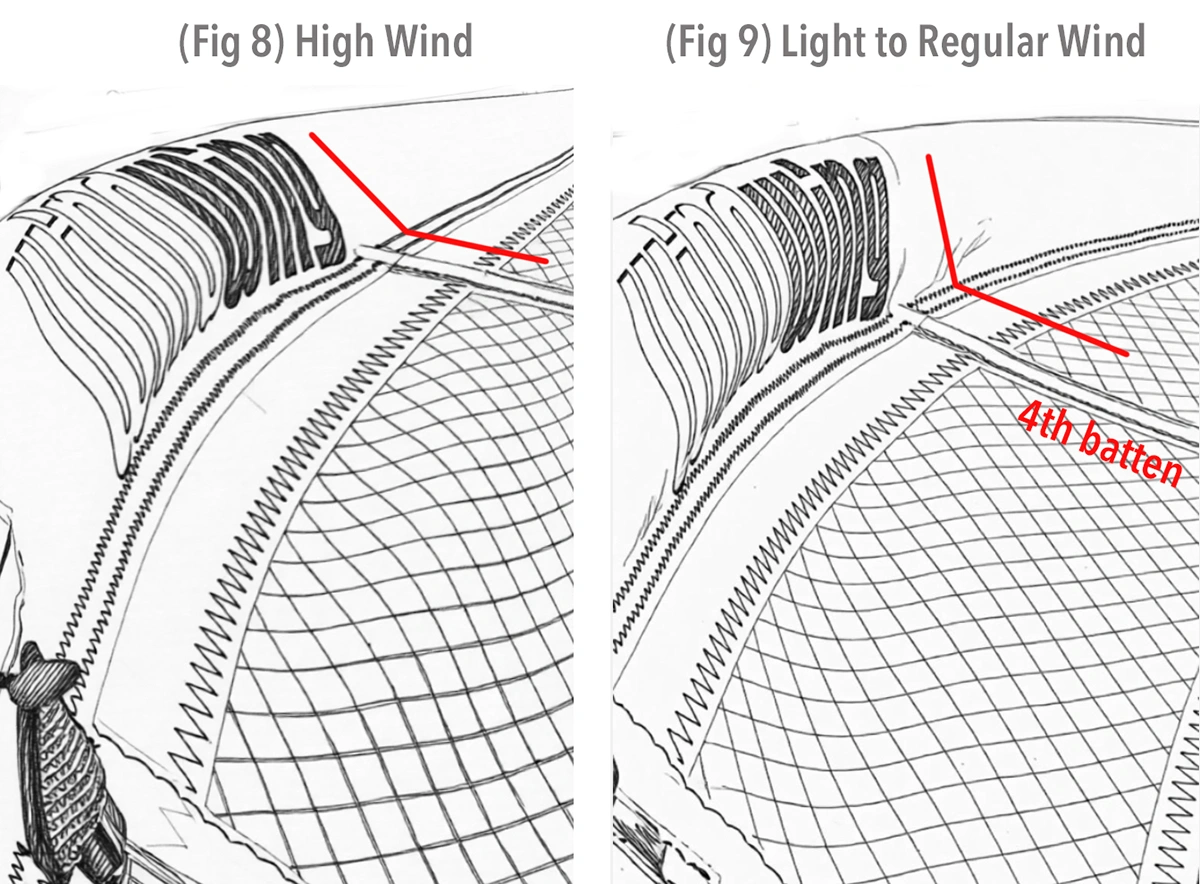
High Wind: Consistently above 25knots: Downhaul sail until the 4th batten sleeve is almost straight out from the mast. (If wind range is not consistently above 25, less downhaul can be applied)
Low to Medium Wind: 10-25 knots: Downhaul sail until the 4th batten sleeve is greater than 90 degrees from the mast. Always away from the mast. Never touching.
8: Because of the M-TIP (Multi-Tack Inhaul Panel), the final downhaul level should always have approximately half an inch or less of pulley lines exposed. (Fig 9) This level is necessary for the M-TIP stapps to work efficiently. This means that if you’re faced with stronger winds, you will need to raise the extension by 2 to 4 cm so the downhaul flattens the sail, and the tack is close to the base of the extension.
9: Once the downhaul is set, make sure the clew is free from the boom end and not restricted from moving when M-TIP is activated.
10: Wrap the M-TIP’s straps at the foot of the sail around the base of the extension (Fig 10). Using a RigONE extension is easy because of the built-in M-TIP strap hook. But using a regular extension is also easy if you make sure the straps are grasping the edge of the extension and the universal. For those using regular extensions, it is best to have the universal already attached to the extension.
11: Start tensioning the M-TIP by pulling and pushing each against the other. Meaning — pulling the strap on one of the stop buckles while pushing the other forward to provide tension to set the buckle being pulled. Then reverse (Fig 11) the process like a crancking motion. The amount of tension will depend on how much power is required. Finally, set the third M-TIP strap around the base and tension to equalise the tension for all three or combine all three to add more tension. The third strap is only on 2027 models; it serves as a backup to the two main tensioners at the foot of the sail.
12: Secure the residual straps into the foot pad or tie them down out of the way (Fig 12). Go to the clew and secure the boom to it with slight tension (Fig 13). It’s more to secure the boom to the sail than to tension the clew to the boom.
13: Go to the front of the boom and adjust the height of the boom head. It should be noted that the boom operating position of the RigONE sails can be lower than that of any other sails. Because the M-TIP brings power below the boom, and drag is minimised above the boom, there is no need to have the boom high to leverage against the sail.
14: Once you sail the RigONE, you will feel the relaxed comfort of the sail. It is fast and efficient without a fight. In fact, the more relaxed and upright the operator stands, the faster the sail goes. Having the boom lowered also means the sailor can hook into the harness lines sooner and more easily. In addition, there is no need for longer harness lines.
TROUBLE SHOOTING
Sail Feels Heavy: Not enough downhaul.
Sail Feels Gutless: Too much downhaul and not enough M-TIP tension.
Camber Will Not Stay On The Mast:

Long-Term Solutions:  The easiest is to add one camber spacer and tighten batten tension during the next rigging session.

Quick Solution:  More downhaul.